Remove Unwanted Dark Circles

Learn how to transform dark circles into a face that is camera ready, anytime of the day!

Cheesesteak Recipe

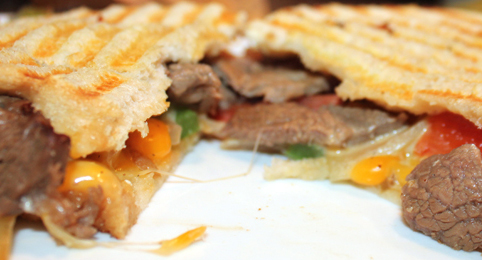
Thinly sliced rib eye, sautéed onions and bell peppers, loads of cheese, sourdough bread toasted on a hot panini press.

Wednesday, November 30, 2011

Chicken & Four Cheese Tortellini Recipe

Chicken & Four Cheese Tortellini

I am what I like to call Step-Italian because my step dad is Italian. I've always grown up with a love of pasta and all things Italian, tortellini is no exception. This is what I had for dinner last night, except I modified the recipe by not adding the mushrooms, because I don't care for them. Enjoy or should I say piacere! :)


Ingredients:
20 ounces dried cheese-filled tortellini
1/2 cup sliced carrots
1 1/2 cups sugar snap peas, halved crosswise
1 tablespoon margarine or butter
3 skinless, boneless chicken breasts, cut into bite-size pieces
1 cup sliced fresh mushrooms
1/3 cup chicken broth
2 tablespoons snipped fresh oregano or 1-1/2 teaspoons dried oregano, crushed
2 teaspoons all-purpose flour
3/4 teaspoon garlic salt
1/2 teaspoon pepper
1 cup milk
1 - 8 ounce package cream cheese or light cream cheese (Neufchatel), cubed and softened
1 tablespoon lemon juice
1 cup quartered cherry tomatoes
1 small red or green sweet pepper, coarsely chopped
2 tablespoons grated Parmesan cheese

Directions:
1. Slice/Dice all your vegetables and set aside.
2. Dice up the chicken breasts and set aside.
3. Cook tortellini in boiling salted water according to package directions, adding the carrot during the last 5 minutes of cooking and the sugar snap peas during the last 1 minute of cooking; drain and set aside.
4. Meanwhile, heat margarine or butter in a 12-inch skillet. Add chicken and mushrooms, and cook about 5 minutes or until chicken is no longer pink. Remove from skillet.
5. Wisk together chicken broth, oregano, flour, garlic salt, and pepper until smooth. Add to skillet along with milk. Cook and stir until thickened and bubbly; add cream cheese. Cook and stir until cream cheese is smooth. Remove from heat. Stir in lemon juice. Add pasta mixture, chicken mixture, tomatoes, and sweet pepper. Toss to coat. Turn into an ungreased 13x9x2-inch baking dish or shallow 3-quart casserole.
6. Bake, covered, in a 350 degrees F oven for 30 to 35 minutes or until heated through. Stir mixture and sprinkle with Parmesan cheese.

Tuesday, November 29, 2011

Remake of Cheddar's Cookie Monster

Cheddar's Cookie Monster

Cheddar's restaurant has the most heavenly desserts that I have ever tasted, the Cookie Monster. I found this recipe on The Pink And Blue Blog for a Pan Skillet Cookie, which is essentially the same thing! Enjoy :)


What You'll Need:
1 stick (8 tablespoons) unsalted butter
1/2 cup granulated sugar
1/2 cup light brown sugar
1 teaspoon pure vanilla extract
1 egg
1 1/2 cups unbleached all-purpose flour
1/2 teaspoon baking soda
1/4 teaspoon kosher salt
1 cup chocolate chunks


Directions:

1. Preheat oven to 350 degrees. Melt butter in an 8 inch cast iron skillet set over medium-low heat. Stir in sugars and vanilla and remove from heat. Let rest until pan is warm, but no longer very hot, about 5 minutes.

2. Crack an egg onto the butter and sugar mixture, and use a fork to whisk it well into the mixture. Place flour, baking soda, and salt on top, and very carefully stir into the mixture until smooth and well-mixed. Stir in chocolate chunks. Place in the oven for 15 minutes, or until starting to turn golden on the top and around the edges, but soft in the center. Serve with vanilla ice cream. 

Organix Hair Care Review

Hair Care: Organix


I am a sucker when it comes to hair care products. If I find a product that I think smells good then I will buy it. Two years ago, I found Organix Coconut Milk Shampoo & Conditioner I had to have it. The product description said:
Organic coconut milk and ultra whipped egg white proteins along with weightless coconut oil to hydrate and nourish your hair as gentle cleansers wash away impurities.
I imagined my hair feeling soft and silky. What I got was that "weightless" feeling. My hair felt squeaky clean and ultra dry. The shampoo and conditioner left my hair pretty much useless when it came to body and styling. I was not happy with that product. However, they do have a serum for Anti-Breakage that I use whenever I want my hair to smell like coconuts. I am not convinced of its powers to stop breakage; however, I do use it for the smell. I stop buying the Organix products and moved on to a different shampoo and conditioner.

About a week ago, while searching for a conditioner, I stumbled upon the new product from Organix: Renewing Moroccan Argan Oil Conditioner. With my new found love of Argan Oil and the expensive cost of the product, I thought this was a cheap steal (about $6). Naturally, I bought the conditioner and the renewing treatment. I went home that night and used it. Only to find myself back in the same situation. My hair felt almost too clean. When I tried to add other products to increase the softness of my hair it was as though nothing could penetrate. I finally learned my lesson and I will be staying away from this product line.


Hare Care Score (1-10): 3

Monday, November 28, 2011

Chicken Enchiladas

Chicken Enchiladas 

After living in Texas for 20 years, I have had a solid relationship with Mexican cuisine. This recipe was something that I just came up with with what I had available in my kitchen. This is a quick 30 min meal.

Ingredients:
3 Chicken Breasts
10 oz can Old El Paso Mild Green Chili Enchilada Sauce
10 oz can Old El Paso Mild (or Medium) Enchilada Sauce
Small can of chopped Old El Paso Green Chilies
1 Yellow Onion (chopped)
1 Green Pepper (chopped)
1 Tomato (chopped)
Tortillas
Cheese
Sour Cream

Directions:
Preheat oven to 350º
1. Boil Chicken in water for about 10 min or until the chicken is no longer pink.
2. Shred Chicken. An easy way to shred chicken is by using a Kitchen Aid Mixer on speed setting 2.
3. Chop the onion, pepper, and tomato and mix with the two enchilada sauces and the can of green chilies.
4. Mix in the chicken.
5. In a oven-safe pan, place the tortilla down and fill with the mixed ingredients and cheese. Fold over and repeat.
6. Once you fill the pan up, place the remainder of cheese on top of the enchiladas.

You can freeze the left over chicken mixture to have for a second meal another time! Allow the chicken to defrost in the refrigerator for a day before use.

Friday, November 25, 2011

How to Make Cake Balls

Cake Balls

Cake balls have been taking over the world of baking for the past year because they are like little individual cakes. Cake balls are relatively easy to make, but do require some time. For this example, I am making Red Velvet Cake Balls with white almond bark and cream cheese frosting. I served them on a platter and surrounded them with clear rock candy.

Ingredients:
1 Box of Cake Mix of your Choice (prepared to the directions on the box)
1 Can of Icing (your choice)
1 Package of Almond Bark or Chocolate
Sprinkles or other decorations of your choice.

Directions:
1. Bake the cake according to the cake box.
2. After baking, take the cake out of the oven and let it sit for about 5 min.
3. Take a large fork and start to crumble the cake up and place the crumbles in a medium bowl.
4. Once all the cake is crumbled into small crumbs, mix in the can of frosting.
5. Line a cookie sheet with wax paper.
6. When fully mixed, take a cookie scooper and place the cake balls on the cookie sheet. You might use more than one cookie sheet or plate depending on how big you make the cake balls.
7. Place toothpicks in each cake ball and then freeze overnight.
8. On the next day, it is time to prepare the chocolate or almond bark for dipping. I take a medium sauce pan and fill it half way up with water. Place it on the stovetop and heat until it boils.
9. Remove the pan from the stove and place a pan or a bowl that fits securely in the sauce pan and add your chocolate or almond bark slowly, stirring as it melts. Once the chocolate is melted you can add in more of the almond bark or chocolate. (This is a long process, about 20 min., but it is the best way to not burn the chocolate)
10. Once all the chocolate or almond bark is melted, remove the cake balls from the freezer and dip into the chocolate and place back on the wax paper. This is when you can add some sprinkles or other decorations to the cake balls before they harden.
11. Once all cake balls are dipped and placed back on the wax paper transfer them to the fridge until you are ready to serve them.

Tuesday, November 22, 2011

Slow Cooker Beef Stroganoff

Slow Cooker Beef Stroganoff


I work an hour away from where I live. When I get home after work, I usually go to the gym. By the time I get home from the gym it is 7:30ish and I really have no motivation to cook. I use a lot of slow cooker recipes because they are easy for me to do. I put all the ingredients in the crock pot the night before, turn it on in the morning, come home at night and it's ready! This is one of my favorites to make.

Ingredients:
• 2-3 pounds stew meat (I like a lot of meet in mine so I tend to just buy two packs of stew meat)
• 1 teaspoon salt
• 
1/4 teaspoon black pepper

• 1 medium yellow onion, diced

• ¼ teaspoon garlic salt

• 1 tablespoon Worcestershire sauce

• 1 ½ cups beef broth
• 
1 tablespoon ketchup

• 1/3 cup flour

• 6-7 tablespoons apple juice (or water)
• 
4-8 ounces sliced mushrooms (I leave out the mushrooms cause I don't like them, lol)
• 
1/2 cup light or regular sour cream
• Cooked Egg Noodles


Directions:
1. Place the stew meat, salt, pepper and diced onion in the slow cooker. Stir to mix the seasonings and onion.
2. In a small bowl, combine the garlic salt, Worcestershrie sauce, beef broth and ketchup.
3. Pour over the meat.
4. Cook for 7-9 hours on low or 4-5 hours on high.
5. About 30 minutes before serving, combine the flour and apple juice in a small bowl, mix well. The combination should be thick but still pourable so add a tablespoon of apple juice or water at a time to thin, if needed.
6. Pour the flour mixture into the slow cooker, stir quickly to mix in the combination with the stew meat and juices and to avoid lumps. Add the mushrooms and stir.
7. Cook on high for 30 minutes.
8. Stir in ½ cup sour cream right before serving.
9. Serve over pasta, rice or baked potatoes.

*Freezable Meal: The leftovers of the stroganoff can be frozen. Store the leftovers in a freezer-safe container and then thaw in the refrigerator (usually takes about a day) and reheat over medium-low heat in a saucepan on the stove.

Monday, November 21, 2011

Individual Apple "Rose" Pies

Individual Apple Rose Pies


I decided to make individual Apple Pies for this year's Thanksgiving as a unique take on my famous Apple Pie.
The thing that I did different this time was instead of just dicing up the apples I decided to peel them. I used a potato peeler to "peel" the apple into thin slices. That way I could form them into a spiral pattern that turns out to look like a rose. For this recipe I doubled the Perfect Pie Crust recipe. If you want a quick version, you can use the store bought pie crust as well. I have altered the recipe from the one that I used a little, because I learned that the apple roses would show more if the caramel sauce was placed in the pie before the apples.

Ingredients:

Perfect Pie Crust Recipe doubled
1/2 cup unsalted butter
3 tablespoons all-purpose flour
1/2 cup white sugar
1/2 cup packed brown sugar
1/4 cup water
1 tablespoon Apple Spice (found in the Spice section of the store)
3-4 Apples

Directions:
Pre-heat oven to 425º F
1. Spray the muffin pans with nonstick spray.
2. Roll the dough out on a floured surface. Use a large circular cookie cuter or you can use a glass with a large diameter to cut out the dough. Fill the muffin pans with the dough.
3. Melt the butter in a medium sauce pan over medium heat.
4. Stir in the flour to form a paste.
5. Mix in the sugar, brown sugar, and water and continue to stir until it becomes thicker (3-5 min)
6. Use a tablespoon to scoop the sauce into each of the pie crusts.
7. Use the potato peeler to peel the apples with the skin on.
8. The tricky part is forming the rose petals. You take a slice of the apple and you start to roll it. You want to make sure that you have pieces that have the skin on the top side because that is what gives the roses some definition. You continue to tightly wrap the apples around. This is difficult and frustrating at first, but once you get the hang of it it becomes easier. Once it got to the point where I could no longer keep it together, I placed it in the pie crusts and then placed more apple slices around to continue to create the rose shape.
9. Once you fill the muffin pan, take the apple spice and lightly sprinkle on top of the pies.
10. Bake for 8-10min at 425º then reduce the temperature to 350º and continue to bake for 15-20 min or until the crust turns a golden brown.

Saturday, November 19, 2011

The Perfect Pie Crust

If there is one thing that I would be famous for (according to my family) would be my apple pie! It was requested by my family members that I make an apple pie for Thanksgiving. I am having my mom's Thanksgiving tomorrow and I wanted to go ahead and make the pie crust so that it would be ready in the morning. Here is my recipe for a buttery pie crust. JUST MAKE SURE YOU DON'T EAT ALL THE DOUGH before you bake it! It's tempting, I promise.

The Perfect Pie Crust
Ingredients:

1 1/4 cups all-purpose flour
1/4 teaspoon salt
1/2 cup butter, chilled and diced
1/4 cup ice water

Directions:
1. Measure out the water and then put it in a cup and in the freezer and allow it to "chill"
2. Place the flour and salt in your mixer. I use a KitchenAid Mixer with the Dough attachment. I believe that the reason most people's pie crust never turns out is because they put too much or too little amount of salt. I believe that I have come up with the perfect amount. Go ahead and turn on the mixer to the lowest setting (1 or 2) and keep it on.
3. Dice up the butter.
4. You are going to want to add the diced butter a little at a time. I usually do 3-4 pieces and then let it mix for 20-30 seconds before I add more. The mixture will start to get clumpy and bunch up on the sides. Use a spatula or a wooden spoon to push the mixture back down.
5. Once all the butter is added, wait until the mixture looks like coarse crumbs before adding the chilled water.
6. Add the chilled water a tablespoon at a time in intervals, so that you don't add too much. Once the dough starts to come together, reduce the amount of water you add until it forms a ball. You might not use all the water, that is okay.
7. Wrap in plastic and refrigerate for 4 hours or overnight.
8. Roll dough out to fit a 9 inch pie plate. Place crust in pie plate. Press the dough evenly into the bottom and sides of the pie plate.

Friday, November 18, 2011

The Truth about Argan Oil

Organic Argan Oil

What it is:
A lightweight oil that can be used as a daily moisturizer or treatment for skin, hair, and nails.

What it does:
This 100% Pure Argan Oil is a legendary oil that's rich in vitamin E and essential fatty acids, and grown organically in Morocco. With its multitasking benefits, Argan Oil can be used for many areas including hydrating and nourishing skin, as a daily moisturizer, skin treatment, treating spilt ends, and softening cuticles. It's gentle enough to use on all skin types and is believed to help with skin conditions including acne. Argan Oil easily absorbs into skin to give you a youthful, dewy glow, and has astonishing healing, conditioning, and antiaging properties to keep your skin and hair nourished and revitalized and to keep you looking beautiful from head to toe.

Why I decided to Use It:
I have extremely thick hair and I LOVE to color it a lot! When I blow-dry my hair it takes me about 30min to get it all dry. Whenever I use the Argan oil spray on my hair it cuts the drying time down in HALF! NO LIES! It also gives a shiny and healthy appearance. I bought my Agadir Argan Oil from CVS for $29.99 and it last a long time. I am going to start using it on my face to see if I can tell the difference there!

Thursday, November 17, 2011

Cheesesteak

Cheesesteak

Thinly sliced rib eye, sautéed onions and bell peppers, loads of cheese, sourdough bread toasted on a hot panini press.

So I have a confession to make. My mom bought me a Hamilton Beach Gourmet Panini Press for Christmas 2 years ago. I have probably used it twice. Usually because I try to limit my carbs and therefore I don't keep bread around and I live by myself so when I would have bread it would go bad before I had a chance to eat it all. I decided to take the Press off from above my refrigerator and experiment with one of my favorite sandwiches: Philly Cheesesteak.


Cheese steak panini, serves 4

1 lb thinly sliced rib eye
1 large onion (sliced)
1 yellow, red, and orange bell pepper (sliced)
1 Tablespoon paprika
1 teaspoon garlic salt
1 teaspoon cayenne pepper
1 teaspoon black pepper
salt, to taste
1 Tablespoon cream cheese
Slices of Cheddar/Mozzarella
french rolls or sourdough bread (I used sourdough bread)

Heat about a tablespoon of extra virgin olive oil along with a tablespoon of butter in a medium cast iron skillet on medium high heat.  Start sauteeing onions, once they have soften add bell peppers and add spices and stir.  Cook until brown and nearly caramelized.  Remove vegetables into a bowl and add cream cheese and let it melt/mix it together.

Next, brown the meat by placing a few (about 1-2) slices on the skillet and flipping over after a few seconds and salting slightly along the way.  Don't crowd or allow the slices of meat to overlap.  Keep removing browned meat, adding fresh slices and repeating.  Once all the meat is cooked, slice it up and add one tablespoon of butter to pan and dump meat, onions and peppers back into pan.  Stir around and then turn the stove off.

Turn on your Panini Press and let it warm up. Prepare your bread by spraying it with I Can't Believe It's Not Butter on both sides. Then place the desired amount of cheese slices and the meat and veggie mix on top of the bread.  Either toast the bread and add filling, or place between two slices of sourdough and toast up on a panini press.

Wednesday, November 16, 2011

How to Remove Dark Circles Under the Eyes


Removing the Unwanted Dark Circles
Have you ever stayed out too late and wake up in the morning looking like this? With my hectic schedule, this is my every day look. I have tried multiple products and "home remedies" and I have finally found the three things that I have found that have worked for me.


1. First, to reduce the swelling and puffiness around the eyes, I put two spoons in the freezer (it  only takes a couple of min. to get cold). Then you place them under your eyes. Simple as that! It works wonders! Not to mention how good the cold spoons feel against your face, especially after a long night of partying.


2. Then, I use the Total Effects Line and Dark Circle Minimizing Brush. This not only instantly reduces the appearance of dark circles and fine lines but it also provides tinted coverage for younger-looking eyes. I have used the product every day for the past year and I absolutely LOVE IT! I have also gotten my mom to use it as well. She swears that it has reduced some of her lines around her eye. I get crazy looks and questions from my family and friends about why I use anti-aging products, but I simply reply, "it's a lot easier to prevent wrinkles and lines than it is to erase them." You can buy this from CVS for $17.95


3. After I apply my base and before I apply concealer, I use Smashbox Photo Op Under Eye Brightener. It provides a lightweight and sheer coverage that really does brighten up under the eyes. I also use this under my nose/above my top lip to brighten up that area. This will make your lips look fuller and larger!
I got this from Sephora for $19


If all else fails, go back to bed!

Tuesday, November 15, 2011

Almost Hitched Tips!

This blog is for anyone who is interested in recipes, fashion, hair care and beauty products.

My name is Johanna and I am a 23 yr old women with a dog and a boyfriend of 2 years.  I am at a different spot in my life than I have ever been before. I am no longer in college or dependent on my parents. This blog is my journey through learning how to cook and how to grow more beautiful with age. Sit back and enjoy.

Share

Twitter Delicious Facebook Digg Stumbleupon Favorites More